



Two nights before the move, the cabinets are open, and a stack of rice bowls sits on the counter with no paper around it. You still need the stove for dinner.
It is a common spot to be in. A kitchen mixes fragile plates, heavy pots and leaky bottles, and you cook in it right up to moving day.
If you’re wondering how to pack a kitchen for moving in Singapore, the short answer is order. Start three to four weeks early. Box up what you rarely use first, and keep one small set of daily items for the final day.
Our climate adds a few twists. Heat spoils food fast, humidity can weaken cheap tape, and movers will not take gas cylinders. Below is a simple week-by-week plan, followed by steps for dishes, pots, appliances, and food.
Start Early and Declutter Your Kitchen First
You cannot empty a kitchen in one weekend. You still need it for breakfast, for dinner, and for the midnight kettle. So the job has to happen in layers, starting with things you never touch and ending with things you touch every day.
Sorting comes first. Every item you bring costs paper, box space, wrapping time and room in the lorry. Every item you leave behind is one less thing to wrap.
Sort Your Cabinets and Your Food
Go through one cabinet at a time. Look for cracked mugs, lids that lost their pots, and the third spatula. Check the top shelf too, where the party platters and the steamboat pot tend to hide.
Then ask one question: have I used this in the last 90 days? If not, give it away, sell it or throw it out. Keep the once-a-year things you truly love, like that steamboat pot.
Food needs the same sorting. Stop stocking up as soon as you set your moving date, and cook through the freezer and pantry instead. Anything sealed and still in date can go to neighbours, friends or family. Our heat spoils food fast, so hand off what you cannot finish while it is still fresh. For a fuller method that covers the whole house, room by room, read our guide on effective ways to declutter before you move.
Your Week-by-Week Kitchen Packing Checklist
Use this as your schedule:
- 4 weeks out: Sort cabinets and drawers, start using up frozen and pantry food, and collect boxes and paper.
- 3 weeks out: Pack what you use only a few times a year, such as fine china, party platters, baking trays and spare glasses.
- 2 weeks out: Pack what you use once in a while, like extra cookware, rarely used appliances and the second set of bowls.
- 1 week out: Pack most of the pantry, the shelf decor and any pots you can live without. Set aside one small daily set of plates, cups, utensils and a pot.
- 2 days out: Pack everything except that daily set.
- Moving day: Pack the daily set and the fridge items last, then wipe down the counters.
Small kitchen? Squeeze the first three steps into one week. Have boxes and paper ready before you wrap the first plate, so supplies come next.
Get the Right Supplies Before You Wrap Anything
Wrapping stops the moment the paper runs out. Then you grab a tea towel, an old T-shirt or a takeaway bag, and the padding gets sloppy. Gather everything first.
Match Your Box Size to the Weight
Use small boxes for anything heavy, like canned food, jars, sauce bottles and cast-iron pots. A big box full of pots is hard to lift, and the bottom can split while someone carries it. Medium boxes suit plates, bowls and most small appliances. Large boxes are for light, bulky things like plastic containers and baskets.
Glasses need a bit more help. Get boxes with cardboard dividers, or make your own with paper. Each glass then sits in its own slot and cannot knock into the next one.
Most people underestimate how many boxes a kitchen takes. Buy a few more than you think you need.
Paper, Tape and Free Boxes
Wrap in plain packing paper or unprinted newsprint. Old newspaper is a common shortcut, but the ink rubs off onto plates and cups, and you end up washing everything again. Keep some bubble wrap for your best glassware and ceramics. A thick marker, zip-top bags and a few spare towels for padding round out the kit.
Tape matters more in Singapore than most people expect. Cheap tape can peel in the humidity, and a box that pops open on the lorry is a bad surprise. Buy strong tape and run an extra strip along the bottom seam.
Boxes can cost you nothing. Try supermarkets like FairPrice, Sheng Siong and Giant, and ask staff when they restock. Liquor shops are worth a visit too, since their bottle boxes are sturdy and come with dividers. Skip wet-market boxes, which can hold moisture and smells. For the other rooms in your home, see our complete guide to packing your whole house for a move.
With supplies ready, you can start wrapping. Dishes come first.
How to Pack a Kitchen for Moving, Item by Item
Talk to enough people who’ve moved house, and you’ll hear the same story: something got broken, and it was usually a plate, a bowl or a cup. Around 48% of movers go through this, according to a UK survey covered by LBC, and crockery is a usual suspect. Every kitchen item breaks or dents differently, so each one needs its own method. Start with the fragile items, while you still have patience for careful wrapping. One rule covers them all: line the bottom of every box with a thick layer of crumpled paper. It softens bumps for everything sitting above it.
How to Pack Dishes for Moving
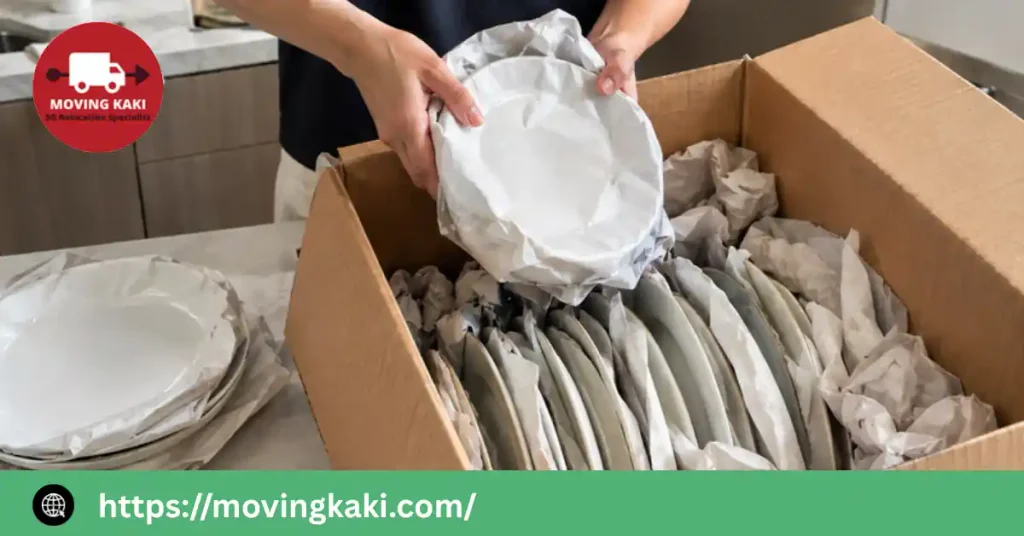
Stacked flat, the bottom plate carries the weight of every plate above it, and one bump can crack it. Standing plates on their edge spreads that load out, so no single plate takes it all.
Wrap each plate in its own sheet of packing paper. Put the plate in the middle, fold a corner over it, then tuck in the other edges. Sturdy everyday plates can go in bundles of four. Always wrap fine china one by one. Stand the bundles upright in the box like books on a shelf, and fill any gaps with crumpled paper or a folded towel.
Glasses, Cups and Mugs
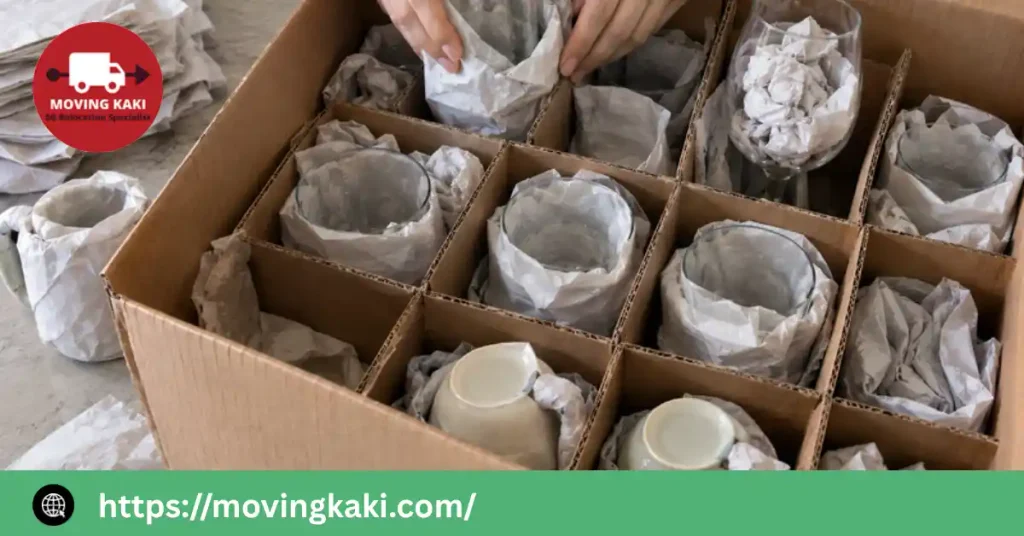
Dividers do most of the work here. Each glass gets its own slot, so it cannot knock into its neighbour.
Wrap every glass in a few sheets of paper. For wine glasses, put a little crumpled paper inside, then wrap the outside. Set them in the slots with the rim facing up. Place mugs and cups upside down, with extra paper around each handle, since the handle is the weak point.
Do not put anything on top of the glasses inside the box, and do not stack other boxes on it. Ask your movers to keep it low in the lorry.
Packing Fragile Kitchenware Like Rice Bowls and Teapots
Many Singapore kitchens hold pieces that many guides skip, like porcelain rice bowls, ceramic teapots and glass food containers with lids. The same rule applies to all of them. Nothing fragile should touch the box wall or another piece.
You can stack rice bowls with a sheet of paper between each one. For a teapot, wrap the handle and spout first, then the whole pot. Wrap the lid separately so it cannot clink against the body. Remove lids from glass containers and wrap each lid separately.
Never mix fragile pieces and heavy cookware in one box. A shifting pot can crack everything beside it. Mark the outside “fragile” so the crew handles it with care.
How to Pack Pots and Pans
Cookware can survive a bump that would shatter a plate, but it still needs a system.
- Nest smaller pots inside bigger ones. Put a sheet of paper between each layer so the metal does not scratch.
- Wrap frying pans and lids separately, then group them by size.
- Dry a well-seasoned wok completely before boxing it. Trapped moisture leads to rust.
- Set the wok at the bottom of a small box, with pot lids stacked on top.
Keep pots and pans in their own box, away from plates and glassware. If a pot shifts mid-move, the plate next to it loses.
Knives and Utensils
A loose knife in a box is a hazard for whoever opens it next. Wrap each blade individually in paper first, then roll the bundle in a dish towel. Lay it flat inside a small pot or a lidded container, rather than tossing it in loose.
Everyday cutlery is simpler. Wrap the whole utensil tray in plastic wrap to keep the pieces in order. Wrap the tray again in a layer of paper, then box it. Set your serving spoons and spatulas aside, wrap them as one bundle, and tape it to the top of the box so they’re the first thing you see when you open it.
Packing Kitchen Appliances
An appliance looks tough on the outside, but the moving parts inside are often the weak point.
- Unplug each appliance, then clean and dry it fully. Leftover food or water can smell bad or cause damage over hours in a sealed box.
- Wrap the cord around the appliance and tape it down, so it doesn’t swing loose and scratch anything.
- Use the original box where you have it. Rice cookers, air fryers and blenders travel best in the foam insert shaped for that exact model.
- No original box? Wrap the appliance in bubble wrap and set it in a snug box, padded on every side.
- Drain water dispensers completely before the move.
Keep anything heavy off the top of appliance boxes, or carry them separately if you can.
Food and liquids come with their own rules, since Singapore’s heat changes what you can safely bring along.
Food, Liquids and What Movers Won’t Carry
Food and liquids behave differently from everything else in the kitchen. They spoil, they leak, and some aren’t allowed on the lorry at all. Sort these out early, so nothing holds up your movers on the day.
Eating Down Your Pantry and Fridge
Start winding down your grocery shopping a few weeks before the move. Cook through the freezer first, since frozen food is the hardest to transport safely. Move on to the pantry, then the fridge, so you have as little as possible on moving day.
If you cannot finish something, don’t throw it away if it is still sealed and in date. Share it with neighbours, friends or family, or drop it at a food bank. In Singapore’s heat, anything perishable spoils faster than you might expect, so don’t let it sit around for the last week.
Dry goods like rice, pasta and spices can travel if you are bringing them. Seal them tightly in airtight containers or double-bagged zip-top bags so a torn packet doesn’t spill into the whole box.
Packing Liquids Without a Leak
A loose cap can ruin everything around it. Keep sauces, oils, and other liquids tightly closed and standing upright. Wrap a layer of plastic wrap around each cap for extra protection, then pack the bottles in a small box on their own, away from paper goods and appliances. If a leak does happen, it stays contained there instead of spreading.
Keep cleaning products separate from food too. Both are liquids, and it is easy to mix up a box once everything is wrapped and sealed.
What Movers Won’t Carry From Your Kitchen
Some kitchen items never make it onto the lorry, whatever mover you use:
- Gas cylinders. Return yours to your gas supplier instead of packing it.
- Aerosol cans, which can burst under heat.
- Perishable food, which spoils before it reaches your new home.
- Any open or loose liquid, which can leak onto everything nearby.
If you are unsure whether something is allowed, ask before moving day. A half-used gas cylinder or an open bottle of cooking oil is exactly the kind of item worth a quick photo and a message to your movers first.
Once you’ve sorted the food and liquids, seal, label, and set aside what you’ll need first.
Seal, Label and Pack Your Essentials Box
A well-packed box can still cause trouble if it isn’t sealed properly or labelled clearly. This last stage is where a lot of the day’s stress either disappears or gets worse, so it’s worth doing carefully.
Fill Gaps and Seal Every Box
Even a carefully wrapped item can shift if there’s empty space around it. Fill gaps with crumpled paper, a spare towel or a folded T-shirt, anything soft that stops movement. Then give the box a gentle shake. If you hear or feel something move, open it back up and add more padding.
Seal the box with strong tape, running an extra strip along the bottom seam where the weight sits. A box that opens mid-lift is how a whole shelf of plates ends up on the floor.
Label With Kitchen Packing Tips That Actually Help
“Kitchen” on the side of a box tells nobody very much. Write what’s inside and how to handle it: “fragile, glasses” or “sauces, keep upright” tells the crew exactly what to watch for. Mark an arrow on any box that has a top and a bottom, so it never gets flipped by accident.
Colour-coding helps too, if you’re doing a lot of boxes at once. Pick one colour of tape or sticker for the kitchen, and use it on nothing else. It’s one more way for the crew to sort boxes fast without reading every label.
Pack a First-Night Kitchen Box
Set aside one box that never goes near the packing pile until the very end. It should hold one plate, one bowl, one cup and one set of utensils per person, plus a small pot, a kettle and a few teabags or coffee sachets. This box travels with you, not buried in the lorry, so you can make breakfast the next morning without digging through thirty boxes first.
Three Mistakes Worth Avoiding
- Leaving everything to the last night. Rushed packing is when most breakage happens.
- Mixing heavy and fragile items in one box. A shifting pot can crack a plate right next to it.
- Overpacking a box until it’s too heavy to lift safely. If you can’t lift it with one hand free, it’s too full.
With everything packed, sealed, and labelled, the last decision is whether to do it yourself or hand it to your movers.
DIY vs Professional Packing: Which Is Right for Your Kitchen?
There’s no single right answer here. It comes down to how much time you have and how much fragile stuff you own.
Comparing the Two Options
| Pack it yourself | Movers pack it | |
| Time needed | Several evenings spread over weeks | Usually a few hours |
| Cost | Materials only | Added to your moving quote |
| Breakage risk | Depends on your own care and supplies | Lower, with trained packers and the right materials |
| Best for | Smaller kitchens, plenty of lead time | Lots of glassware, china or a tight schedule |
Which Should You Choose?
If you have a small kitchen and a few weeks to spare, pack it yourself. Follow the timeline earlier in this guide, and you’ll get through it without rushing.
If your kitchen is full of glass, fine china or things you’d hate to lose, getting help is worth it. A trained crew works through fragile items faster and with less risk than doing it solo, since wrapping breakable kitchenware all day is second nature. If you’d rather hand that part over, Moving Kaki’s packing and unpacking service covers exactly this kind of kitchen. Our crews handle fragile items daily, so they know how to wrap a stack of rice bowls or a glass-lidded pot without wasting time or materials.
If you’re somewhere in between, split the work. Pack the pantry and your everyday cookware yourself, and leave the fragile pieces, the glassware, the china, the rice bowls, to the professionals. It doesn’t have to be one or the other.
Either way, the kitchen doesn’t have to be the hardest room to move.
Conclusion
A kitchen move comes down to one thing: order. Pack what you rarely use first, protect the fragile pieces properly, and keep one small set of daily essentials until the very last day.
Get that order right, and your kitchen lands in the new place ready to use, not buried under thirty unlabelled boxes. Moving Kaki has helped Singapore homes move for years. Our team plans around lift bookings, tight HDB corridors and loading bay timing, the kind of details that turn a moving day into a long one if nobody catches them early.
Your kitchen deserves to arrive in one piece. Request a free quote for your house move, and let Moving Kaki make sure it does.
FAQs
How many boxes do you need to pack a kitchen?
There’s no single number, since it depends on how much you own and how many appliances you’re bringing. For most homes, plan on roughly 10 to 15 medium boxes for an average kitchen, and more if you have a big pantry, a full set of glassware or several small appliances. Buy a few extra so you don’t run out halfway through wrapping your plates.
Do you need to defrost the fridge before moving day?
It matters more than people expect. Turn the fridge off and prop the doors open about a day before the move, with towels underneath to catch the meltwater. A fridge sealed shut while still damp can grow mould before you even plug it back in at the new place.
What’s the fastest way to pack a kitchen if you’re short on time?
Skip sorting by category and grab whatever’s fastest to fill: laundry baskets and suitcases for pantry items, and boxes only for anything breakable. Wrap glasses and plates first, since they’re the items most likely to cause a mess if rushed. If you’re truly out of time, a packing service from your movers covers the kitchen in a few hours instead of a few evenings.
Can you pack a kitchen without bubble wrap?
Plenty of people do. Bath towels, clean clothes and bed linen work as padding around plates and glasses, and they’re already things you’re packing anyway. Just make sure whatever you use is clean and dry, since a damp towel against ceramic can leave marks.
What should you do with half-used bottles and jars?
Seal the cap tightly, wrap the opening in a layer of plastic wrap, and pack the bottle upright in a small box with other liquids. If a bottle is nearly empty or you won’t use it again soon, it’s often easier to finish it or give it away than to pack it.


